By Dennis Collin
One of Revit’s major initial appeals as a piece of software besides it’s coordination and scheduling functionality, is the ability to present models in a 3D manner. This is invaluable in selling a design concept, evaluating an internal space or as a quick sanity check for coordination purposes.

Fig 1. Revit’s standard presentation tools can be located under the View tab on the ribbon.
Revit’s presentation tools are expansive both with out of the box (OOTB) tools such as the rendering of still images, produced both locally and in the cloud. The cloud rendering service also permits the creation of panoramic images similar to Google Street View. Also, out of the box there is a walkthrough tool. However, editing the camera path to traverse 3D elements such as ramps and stairs can be something of a challenge!
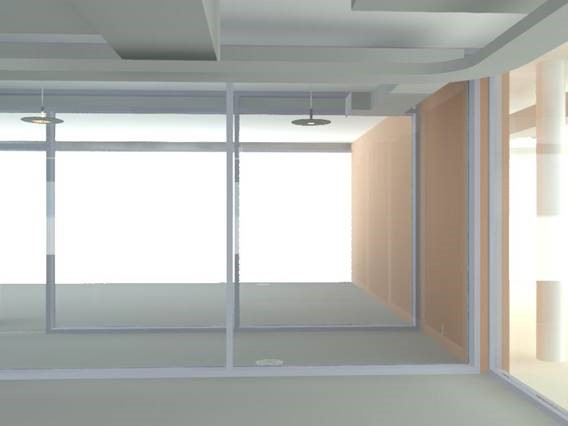
Fig 2. Still render using Revit’s standard out of the box renderer
Fortunately, Revit has a myriad of plug-ins to present the model in several different ways. From the powerful Vray renderer to produce high quality stills in an easy to use environment, to more interactive tools like Revit Live or Enscape which provide the ability to export the model as an interactive environment with textures, lighting and shadows and the use of a mouse or headset interface to literally walkaround the building.
My previous blog on the Enscape application can be found here:
https://www.cadlinecommunity.co.uk/hc/en-us/articles/115005771549-Enscape-2-1-now-available
The plug-ins are paid for generally as a monthly subscription and are good value to ease the process of producing high quality output without having to seek out a rendering specialist with bespoke knowledge. These products export a viewable 3D model in a self-contained singular package i.e. No separate viewing software or Revit is required. This makes it much easier to share with colleagues or clients without having to worry about the installation of video codecs or playback software. An additional issue to consider is time, depending on the quality and length of animation rendering a walkthrough video can take days! An interactive model can be produced in a matter of minutes!
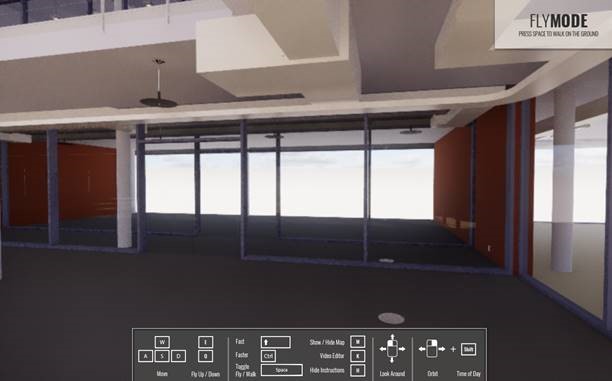
Fig 3. Sample Revit MEP model exported to an interactive environment, with a pre-set user interface
However, for simple model viewing where near photo-realism isn’t required there is another option of using a free plug-in. Although not photorealistic, it does have a day and night environment with lighting, shadows and some simple texture mapping. The plug-in can be downloaded and installed from the App. store. The application is a proof of concept add-in to connect Revit and the Unity gaming development platform. This tool allows users to have the first-person 3D shooter game like experience while using a Revit created model as the 3D environment.
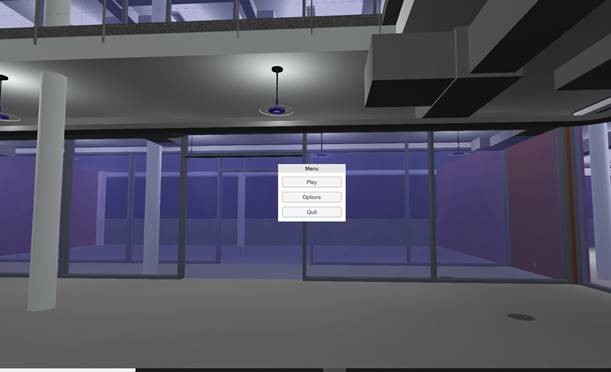
Fig 4. Sample MEP Revit model exported to the Unity Engine viewer
Whilst not as realistic as Enscape, Vray, or Revit Live etc. in many cases the output should be sufficient to visualise and navigate a Revit model for a variety of applications with no additional monthly cost. The package consists of an executable with a data folder making it relatively easy to upload to a shared cloud folder or portable media.
The Revit to Unity plug-in can be found here:
https://apps.autodesk.com/RVT/en/Detail/Index?id=8504039956372146040&appLang=en&os=Win64
For details on Vray for Max, Vray for Revit, Enscape, Revit Live and other products:
https://software.cadline.co.uk/media-entertainment/
Or alternatively contact sales@cadline.co.uk
Visit Cadline Community for more blogs.